Back to Blog

Build a Voice Chat App with Live Transcriptions Using React Native and Agora SDK

Build a Voice Chat App with Live Transcriptions Using React Native and Agora SDK

David Ubong Ekanem is a creative software engineer who enjoys building applications that explore new technologies and the link between learning and writing.

Interested in writing an Agora tutorial blog? Send us your topic today!


Communication is an essential part of our daily lives. With the proliferation of mobile technology, voice chat applications enable interconnectivity. Keeping track of what was said in the meeting can be challenging during video meetings.

Come with me as we build a service that’s useful for taking notes by students or businesses. We will build a React Native application that supports speech-to-text transcription. We’ll go over the structure, setup, and execution of the app before diving into how it works.

We’ll be using the Agora RTC SDK for React Native for the example below. I’m using v4.1.0 at the time of writing.

Create an Agora account

Go to https://console.agora.io/ to create an account and log in to the dashboard. You can follow this guide for reference: https://www.agora.io/en/blog/how-to-get-started-with-agora.

Build a Voice Chat App with Live Transcriptions Using React Native and Agora SDK - Agora Console
Agora Console

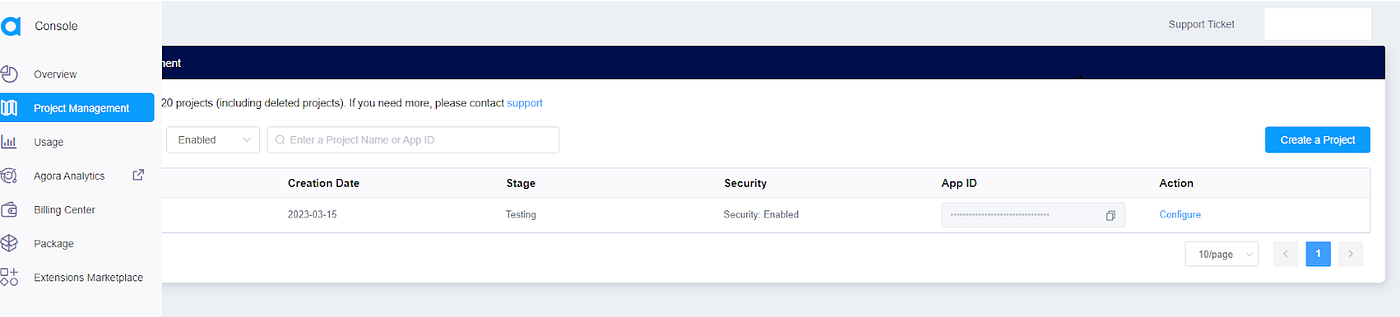
Click the sidebar then click the Project Management tab, under Project Management. Click the Create Project button to create a new project.

Once the project is created, retrieve the App ID. Select an App ID with a token, and obtain a temporary token for the project. On the edit page, click the link to generate a temporary token. The temporary token is used for authorizing requests while developing the application.

Note: Token authentication is recommended for all RTE apps running in production environments. For more information about token-based authentication on the Agora platform, see this guide: https://docs.agora.io/en/Video/token?platform=All%20Platforms

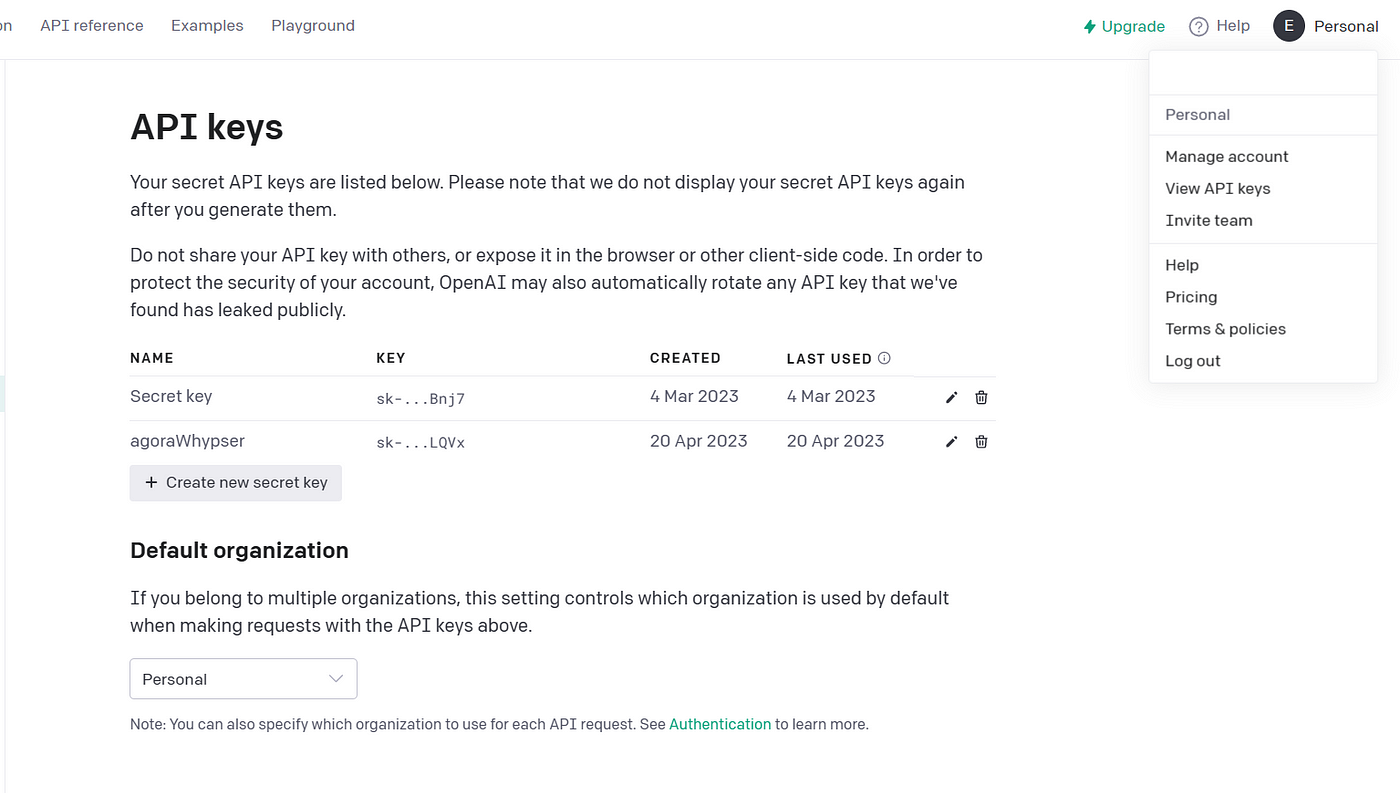
Create an OpenAI account

Go to https://platform.openai.com/ to create an account, and log in to the dashboard. Click the user section tab and select View API keys. Retrieve the API key, or create a new one specifically for this project.

Build a Video Call Application with Transcription With React Native and Agora SDK- API reference OpenAI
API reference OpenAI

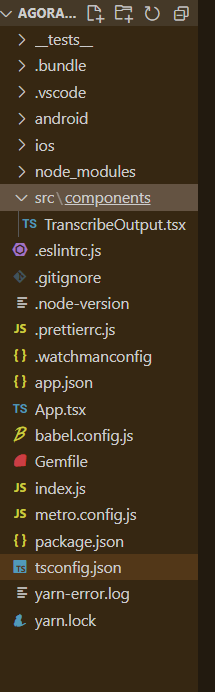
Structure of our application

Build a Video Call Application with Transcription With React Native and Agora SDK - Structure of the application

Let’s run the app

The LTS version of Node.js and NPM need to be installed on your system.

  1. Ensure that you have registered an Agora account, set up a project, and generated an App ID (and temporary token).
  2. Ensure that you have registered an OpenAI account and retrieved your API key.
  3. Download and extract the ZIP file from the master branch.
  4. Run yarn or npm install to install the app dependencies in the unzipped directory.
  5. Navigate to ./App.tsx and enter the App ID that was obtained from the Agora Console appId: ‘<YourAppIDHere>’. If you’re using tokens, enter your token and channel name.
  6. If you’re building for iOS, open a terminal and execute cd ios && pod install
  7. Run yarn start or npm run start to start the metro server.
  8. Once the metro server starts, you should see the following display in your console.
Build a Video Call Application with Transcription With React Native and Agora SDK - React Native loaded successfully
React Native loaded successfully
  • The iOS and Android simulator does not support the camera. Use a physical device instead.
  • The application should start on your physical device.

That’s it. You should be able to join or leave a call. The app uses the agoraReactNativeStream as the channel name.

Getting to how it works

import React from 'react';
import {Text, View, StyleSheet} from 'react-native';
const TranscribedOutput = ({transcribedText, interimTranscribedText}: any) => {
if (transcribedText.length === 0 && interimTranscribedText.length === 0) {
return <Text>...</Text>;
}
return (
<View style={styles.box}>
<Text style={styles.text}>{transcribedText}</Text>
<Text>{interimTranscribedText}</Text>
</View>
);
};
const styles = StyleSheet.create({
box: {
borderColor: 'black',
borderRadius: 10,
marginBottom: 0,
},
text: {
fontWeight: '400',
fontSize: 30,
},
});
export default TranscribedOutput;

We’re exporting a component that accepts the transcribed text and interimTranscribedText and displays the TranscribedText. This is used for displaying the transcribed text from our video call.

The App.tsx file contains the core logic of our video call.

import React, {useRef, useState, useEffect} from 'react';
import {
SafeAreaView,
ScrollView,
StyleSheet,
Text,
View,
Switch,
ActivityIndicator,
} from 'react-native';
import {PermissionsAndroid, Platform} from 'react-native';
import RNFS from 'react-native-fs';
import RNFetchBlob from 'rn-fetch-blob';
import {
ClientRoleType,
RawAudioFrameOpModeType,
AudioFrame,
createAgoraRtcEngine,
IRtcEngine,
RtcSurfaceView,
ChannelProfileType,
AudioFileRecordingType,
} from 'react-native-agora';
import axios from 'axios';
import FormData from 'form-data';
import TranscribedOutput from './src/components/TranscribeOutput';
const uid = 0;
const appId = '<Agora App ID>';
const token = '<channel token>';
const channelName = 'agoraReactNativeStream';
const OPEN_API_KEY = '';
const SAMPLE_RATE = 16000;
const SAMPLE_NUM_OF_CHANNEL = 1;
const SAMPLES_PER_CALL = 1024;
view raw App.tsx hosted with ❤ by GitHub

We start by writing the import statements. Next, we have some constants for our App ID, token, open-AI key, and channel name. The other constants (sample rate, number of channels, and samples per call) specify how we want to store our audio file.

import React, {useRef, useState, useEffect} from 'react';
import {
SafeAreaView,
ScrollView,
StyleSheet,
Text,
View,
Switch,
ActivityIndicator,
} from 'react-native';
import {PermissionsAndroid, Platform} from 'react-native';
import RNFS from 'react-native-fs';
import RNFetchBlob from 'rn-fetch-blob';
import {
ClientRoleType,
RawAudioFrameOpModeType,
AudioFrame,
createAgoraRtcEngine,
IRtcEngine,
RtcSurfaceView,
ChannelProfileType,
AudioFileRecordingType,
} from 'react-native-agora';
import axios from 'axios';
import FormData from 'form-data';
import TranscribedOutput from './src/components/TranscribeOutput';
const uid = 0;
const appId = '';
const token = '';
const channelName = '';
const OPEN_API_KEY = '';
const SAMPLE_RATE = 16000;
const SAMPLE_NUM_OF_CHANNEL = 1;
const SAMPLES_PER_CALL = 1024;
const App = () => {
const agoraEngineRef = useRef<IRtcEngine>(); // Agora engine instance
const intervalRef: any = React.useRef(null);
const [isJoined, setIsJoined] = useState(false); // Indicates if the local user has joined the channel
const [isHost, setIsHost] = useState(true); // Client role
const [remoteUid, setRemoteUid] = useState(0); // Uid of the remote user
const [message, setMessage] = useState(''); // Message to the user
const [transcribedData, setTranscribedData] = React.useState([] as any);
const [isJoinLoading, setJoinLoading] = React.useState(false);
const [isLeaveLoading, setLeaveLoading] = React.useState(false);
const [isTranscribing, setIsTranscribing] = React.useState(false);
const [transcribeTimeout, setTranscribeTimout] = React.useState(5);
const [interimTranscribedData] = React.useState('');
function transcribeInterim() {
clearInterval(intervalRef.current);
}
const getPermission = async () => {
if (Platform.OS === 'android') {
await PermissionsAndroid.requestMultiple([
PermissionsAndroid.PERMISSIONS.RECORD_AUDIO,
PermissionsAndroid.PERMISSIONS.CAMERA,
]);
}
};
const iAudioFrameObserver = {
onPlaybackAudioFrame(channelId: string, audioFrame: AudioFrame): true {
return true;
},
oPlaybackAudioFrameBeforeMixing(
channelId: string,
uID: number,
audioFrame: AudioFrame,
): true {
return true;
},
onRecordAudioFrame(channelId: string, audioFrame: AudioFrame): true {
return true;
},
};
useEffect(() => {
// Initialize Agora engine when the app starts
setupVideoSDKEngine();
}, []);
const setupVideoSDKEngine = async () => {
try {
// use the helper function to get permissions
if (Platform.OS === 'android') {
await getPermission();
}
agoraEngineRef.current = createAgoraRtcEngine();
const agoraEngine = agoraEngineRef.current;
agoraEngine.registerEventHandler({
onJoinChannelSuccess: () => {
console.log('Successfully joined the channel ' + channelName);
setIsJoined(true);
},
onUserJoined: (_connection, Uid) => {
console.log('Remote user joined with uid ' + Uid);
setRemoteUid(Uid);
},
onUserOffline: (_connection, Uid) => {
console.log('Remote user left the channel. uid: ' + Uid);
setRemoteUid(0);
},
});
agoraEngine.initialize({
appId: appId,
channelProfile: ChannelProfileType.ChannelProfileLiveBroadcasting,
});
console.log('Agora engine initialized successfully');
agoraEngine.setPlaybackAudioFrameParameters(
SAMPLE_RATE,
SAMPLE_NUM_OF_CHANNEL,
RawAudioFrameOpModeType.RawAudioFrameOpModeReadWrite,
SAMPLES_PER_CALL,
);
agoraEngine.setRecordingAudioFrameParameters(
SAMPLE_RATE,
SAMPLE_NUM_OF_CHANNEL,
RawAudioFrameOpModeType.RawAudioFrameOpModeReadWrite,
SAMPLES_PER_CALL,
);
agoraEngine
.getMediaEngine()
.registerAudioFrameObserver(iAudioFrameObserver);
console.log('Audio frame observer registered successfully');
agoraEngine.setMixedAudioFrameParameters(
SAMPLE_RATE,
SAMPLE_NUM_OF_CHANNEL,
SAMPLES_PER_CALL,
);
agoraEngine.muteAllRemoteAudioStreams(true);
agoraEngine.enableVideo();
} catch (e) {
console.log(e);
}
};
view raw App.tsx hosted with ❤ by GitHub

We define a functional component in which the agoraEngineClass variable stores the IRtcEngine class. This class provides methods that we can invoke in our application to manage the video call. The useState hook stores the data of our transcribed text.

The setupVideoSDKEngine initializes the Agora engine on app start. The application requests needed permissions, and if they are granted, the Agora engine initializes. We register the audioFrameObserver to be able to access onPlayAudioFrame methods if needed.

const join = async () => {
setJoinLoading(true);
resetTranscribedData();
const recordingPath = `${RNFS.DocumentDirectoryPath}/audioRecordings`;
RNFS.mkdir(recordingPath);
const fileName = 'recording.wav';
const filePath = `${recordingPath}/${fileName}`;
await RNFS.unlink(filePath).catch(error => {
console.log('Error deleting file:', error);
});
console.log('joining channel');
if (isJoined) {
setJoinLoading(false);
return;
}
try {
agoraEngineRef.current?.setChannelProfile(
ChannelProfileType.ChannelProfileLiveBroadcasting,
);
if (isHost) {
agoraEngineRef.current?.startPreview();
agoraEngineRef.current?.joinChannel(token, channelName, uid, {
clientRoleType: ClientRoleType.ClientRoleBroadcaster,
});
console.log('recording started as a broadcaster');
agoraEngineRef.current?.startAudioRecording({
filePath: filePath,
encode: false,
sampleRate: SAMPLE_RATE,
fileRecordingType: AudioFileRecordingType.AudioFileRecordingMixed,
});
} else {
agoraEngineRef.current?.joinChannel(token, channelName, uid, {
clientRoleType: ClientRoleType.ClientRoleAudience,
});
console.log('recording started as audience');
agoraEngineRef.current?.startAudioRecording({
filePath: filePath,
encode: false,
sampleRate: SAMPLE_RATE,
fileRecordingType: AudioFileRecordingType.AudioFileRecordingMixed,
});
}
setJoinLoading(false);
} catch (e) {
console.log(e);
}
};
view raw App.tsx hosted with ❤ by GitHub

The join function is particularly useful as it enables us to join our desired channel. If transcribedText is available in the state, we clear it before joining the channel. We trigger the startAudioRecording method. We pass in the desired filePath for storing our audio.

We rely on the React Native File System to access the native file system of our React Native application. Encoding is set to false, and the constant SAMPLE_RATE represents the sample rate. Set the fileRecordingType to AudioFileRecordingMixed. We are set to record the mixed audio of the local and all remote users.

const leave = async () => {
setLeaveLoading(true);
try {
agoraEngineRef.current?.leaveChannel();
agoraEngineRef.current
?.getMediaEngine()
.unregisterAudioFrameObserver(iAudioFrameObserver);
console.log('stop recording ');
agoraEngineRef.current?.stopAudioRecording();
startTranscribe();
setRemoteUid(0);
setIsJoined(false);
console.log('you left the channel');
} catch (e) {
console.log(e);
}
setLeaveLoading(false);
};
view raw App.tsx hosted with ❤ by GitHub

The leave function enables the user to exit the channel and stops the audio recording. We unregister the earlier register audioFrameObserver. The application triggers the startTranscribe function once the audioRecording ends.

In the startTranscribe function, the recordingPath and fileName make up the filePath. This filePath shows the way to the audioData. The whisperAPI receives the audioData, and we receive the transcribed text.

We define the render function for displaying the buttons for joining or leaving a call. The render function also displays our transcribed text.

Our finished application.

Conclusion

That’s how easy it is to build a transcription application inside a video call application. You can refer to the Agora React Native API Reference to see methods that can help us quickly add additional features to our application.

If you’re deploying your app to production, you can read more about how to use tokens in this blog post.

I invite you to join the Agora Developer Slack Community. Feel free to ask any React Native questions in the #react-native-help-me channel.

RTE Telehealth 2023
Join us for RTE Telehealth - a virtual webinar where we’ll explore how AI and AR/VR technologies are shaping the future of healthcare delivery.

Learn more about Agora's video and voice solutions

Ready to chat through your real-time video and voice needs? We're here to help! Current Twilio customers get up to 2 months FREE.

Complete the form, and one of our experts will be in touch.

Try Agora for Free

Sign up and start building! You don’t pay until you scale.
Try for Free