
Note: This guide uses v3.x of the Agora Web SDK.
Integrating video streaming features into your application can be very tedious and time-consuming. Maintaining a low-latency video server, load balancing, and listening to end-user events (screen off, reload, etc.) are some of the really painful hassles — not to mention having cross-platform compatibility.
Feeling dizzy already? Fear not! The Agora Video SDK allows you to embed video calling features into your application within minutes. In addition, all the video server details are abstracted away.
In this tutorial, we'll create a bare-bones web application with video calling features using vanilla JavaScript and the Agora Web 3.x SDK.
Prerequisites
- A recent version of Google Chrome
- You can get started with Agora by following this guide and retrieving the App ID
- Also retrieve the temporary token if you have enabled the app certificate
- Agora Web SDK, which you can download here
Project Setup
This is the structure of the application that we are developing:
├── index.html
├── scripts
│ ├── AgoraRTCSDK-2.4.0.js
│ └── script.js
└── styles
  └── style.css
Building index.html
The structure of the application is very straightforward.
You can download the latest version of the Agora Web SDK from Agora's Downloads page and integrate as has been done in this tutorial. Or you can use the CDN version by using this <script> tag instead:
<script src=”https://cdn.agora.io/sdk/release/AgoraRTCSDK-3.1.1.js></script>There is a container with an ID me that is supposed to contain the video stream of the local user (you).
There is a container with an ID remote-container to render the video feeds of the other remote users in the channel.
Building styles.css
Now, let's add some basic styling to our app:
Building the Video Calling Client
First, let's make some helper functions to handle trivial DOM operations like adding and removing video containers in script.js:
Architecture of an Agora Video Call
So what's the diagram all about? Let's break it down a bit.
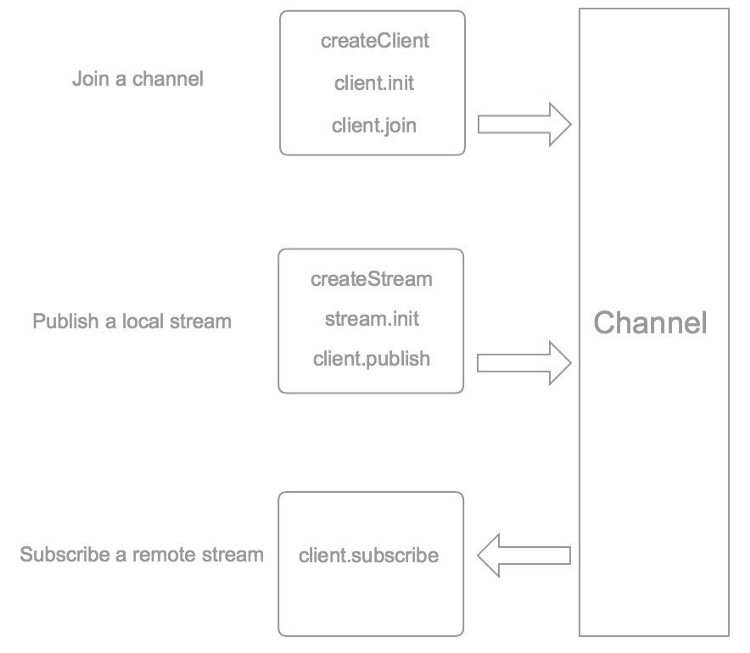
Channels are similar to chat rooms, and every App ID can spawn multiple channles.
Users can join and leave a channel at will.
We’ll be implementing the methods listed in the diagram in script.js.
First, we need to create a client object by calling the AgoraRTC.createClient constructor. Pass in the parameters to set the video encoding and decoding format (vp8) and the channel mode (rtc):
let client = AgoraRTC.createClient({ mode: 'rtc', codec: 'vp8'});Next, we initialize the method with the App ID that we obtained earlier:
client.init("<---Your AppId here--->",() => console.log("AgoraRTC client initialized") ,handleFail);Now we're ready to join a channel by using the client.join method:
client.join(null, "any-channel", null, (uid)=>{
    // publish the video
}, handleFail);
This demo app will not require extra security to join a channel, so pass null for the Dynamic Key value.
Note: This guide does not implement token authentication, which is recommended for all RTE apps running in production environments. For more information about token-based authentication in the Agora platform, see this guide: https://bit.ly/3sNiFRs
We will allow Agora to dynamically assign a user ID for each user who joins in this demo, so pass in null for UID parameter.
Now it's time to publish our video feed into the channel. First, create a stream object by calling the AgoraRTC.createStream constructor, and pass in the appropriate parameters. Afterwards, we will publish the stream to the channel as shown below:
Testing the Project
Run the project by double-clicking the index.html file. Make sure you have the latest version of Chrome for testing the project.
Conclusion
Shazam! Now we can conduct a successful video call in our application.
Note: When you try to deploy this web app (or any other web app that uses the Agora SDK), make sure the server has an SSL certificate (HTTPS connection).
The codebase for this tutorial is available on GitHub.
Other Resources
For more information about building applications using Agora SDKs, take a look at Agora Video Call Quickstart Guide and Agora API Reference.
And I invite you to join the Agora Developer Slack community.


